Review Star provides feature-rich, online submission forms for conferences, film festivals, award nominations, and more. Our cloud-based form builder gets you up and running quickly with a form that matches your workflow perfectly. Capture as much or as little information as you need. Public submissions are web-based, and your users don’t need to create an account or log in to submit.
A detailed submissions process is outlined on this page. Then check out our documentation to learn more about using Review Star. If you have questions or encounter any uncertainty along the way, we are always happy to help. Simply reach out to us to request a demo, or get started right away and try it free.
1. Create Your Submissions Form
When you first log in to Review Star, you will be brought to the dashboard page. From here you will see a blue “Add Form” button that will take you to our intuitive form builder. Simply give your form a name to create a default form. Additional forms can be created with the “Add Form” button on the Forms page.
2. Review Your Default Submissions Form
Take a look at the questions on the form by clicking on the form title, then navigate to the “Form Fields” tab. If the default fields are sufficient, you’re ready to go! Simply return to the “Settings” tab and enable the form using the button near the bottom of the page. The “View Form” button allows you to review the form as your users will see it.

3. Add or Change Fields
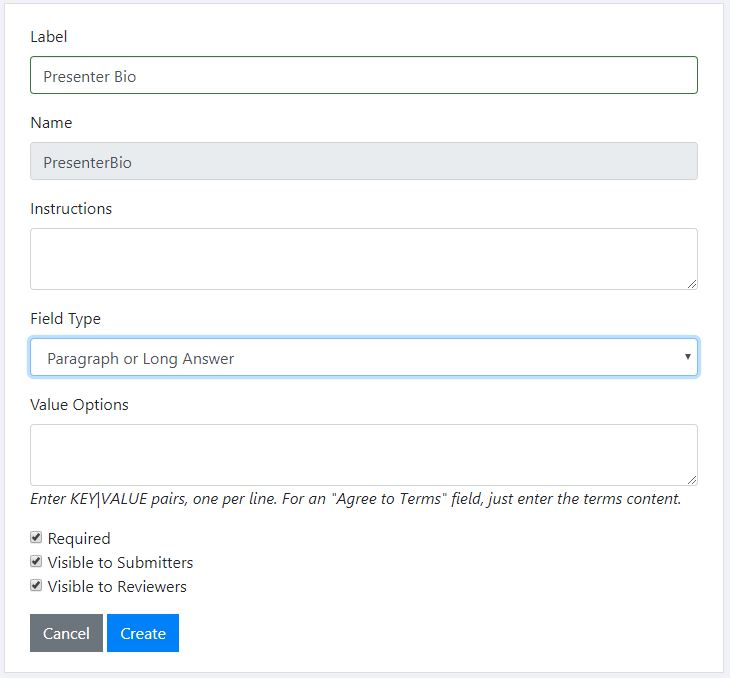
If you’d like to change your form or collect additional information with your submissions form, you can add fields on the “Form Fields” tab. On this page you can add fields, drag-and-drop existing fields to re-order them, or modify a field by clicking its name. When adding or modifying fields, you will be presented with the screen in the image below. Here you can provide instructions, create answer options, and control which fields are required and visible. After editing your form, it’s a good idea to go back and review the form as your users will see it to

4. Group Fields
You may wish to organize your form into sections. To create field groups, use the “Add Group” button at the top of the “Form Fields” tab. You can add one or more field groups to arrange your form in related sections. For example, “Speaker Information”, “Proposed Topic”, and “Agreements”. You can drag-and-drop fields both within and between groups to reorder them as needed. The “Edit” button at the top-right corner of a group allows you to modify the group name and instructions as well as change the order that it appears on the form, If you don’t want to use the grouping feature, simply leave the fields in the default group.

5. Customize Your Form
Now that your form fields are updated and organized, there are several details that you can customize. In the “Settings” tab you can provide details about your event or the submission with the instructions field. You can also upload your logo or tag the form for quick organizing later. Read more about Review Star’s intuitive Tagging System here. You can also create a custom URL in the “Personalization” tab.

6. Enable Your Form
Your submissions form is enabled by default when you create your form. You can enable and disable your form on the “Settings” tab, using the Enable/Disable button. If you want to enforce a precise schedule for opening and closing submissions, simply use the Enable/Disable feature to control when submissions are accepted.
7. Collect Submissions
Once you have updated and enabled your form, you’re ready to start collecting submissions. Use the “View Form” button on the “Settings” tab to visit your public submissions form. Make a note of the URL, as it is unique to your form. Share this URL with your audience so they can use the form. Link to it from your website, send it in emails, and share it via social media. You will be notified by email whenever a new submission is received with Review Star’s Workflow Feature.
Next Steps
After collecting your online submissions, you will typically wish to review and select the best ones. Review Star provides a full-featured review and selection system that your selection committee will love. Your submissions are already available in the review database. To get started, all you need to do is configure a few items in the review section. For a detailed look at this process, see Review and Scoring.